
Arduino 4 Digit 7 Segment Display Tutorial 74hc595 Tutorial
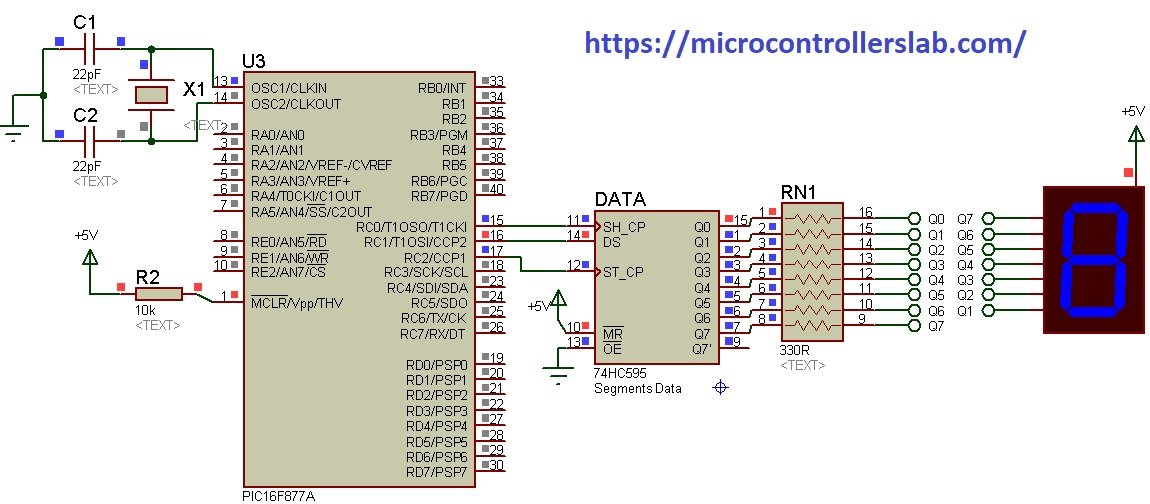
In this topic we are going to see how to make a digital up/down counter using multiplexed 7-segment display with 74HC595 shift register and PIC16F877A microcontroller. From the 74HC595 datasheet this shift register is a high speed, 8-stage serial shift register with a storage register and 3-state outputs. The registers have separate clocks.

74HC595 Interfacing with 7segment Displays and Pic Microcontroller
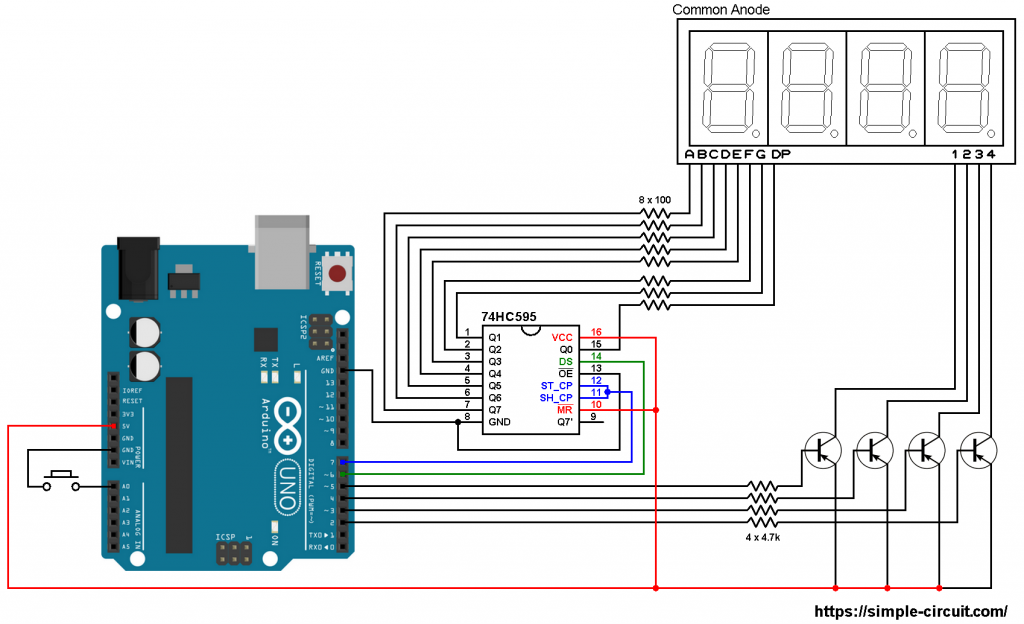
Common anode 7-segment display 74HC595 8-bit serial-in-parallel-out shift register Eight 330 ohm resistors Breadboard and wires Hardware Setup Connect the 7-Segment display and 74HC595 shift register to Arduino hardware: Connect Vcc pin on 74HC595 to 5V pin on Arduino hardware. Connect GND and OE pins on 74HC595 to GND pin on Arduino hardware.

7 segment with 74hc595 Archives FYP Solutions
1.5K Share 101K views 3 years ago Various ways to control single or multiple 7 segment displays Recently I posted a turorial on Controlling 7 Segment displays with Arduino. This video is a.

Arduino lesson 74HC595 with one digit 7segment led display «
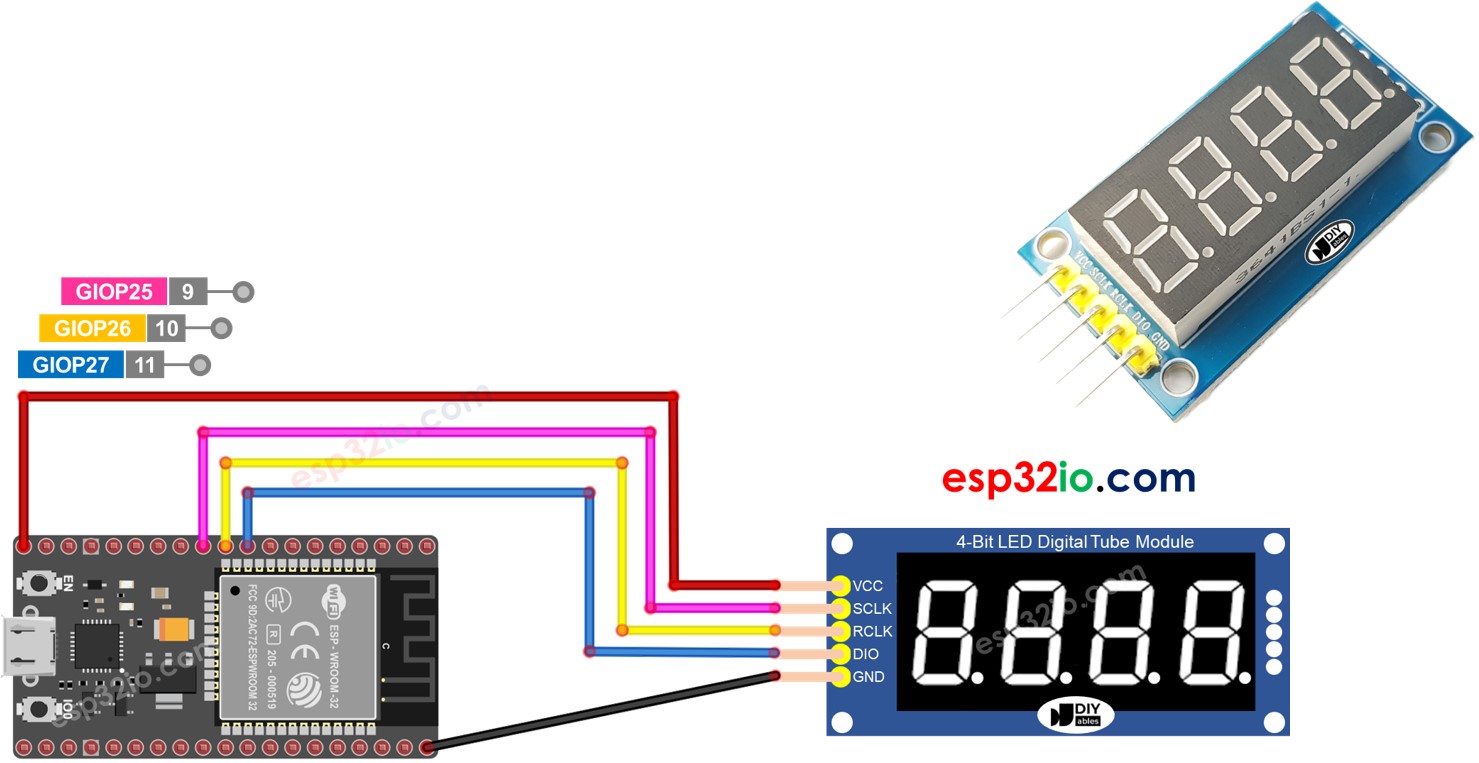
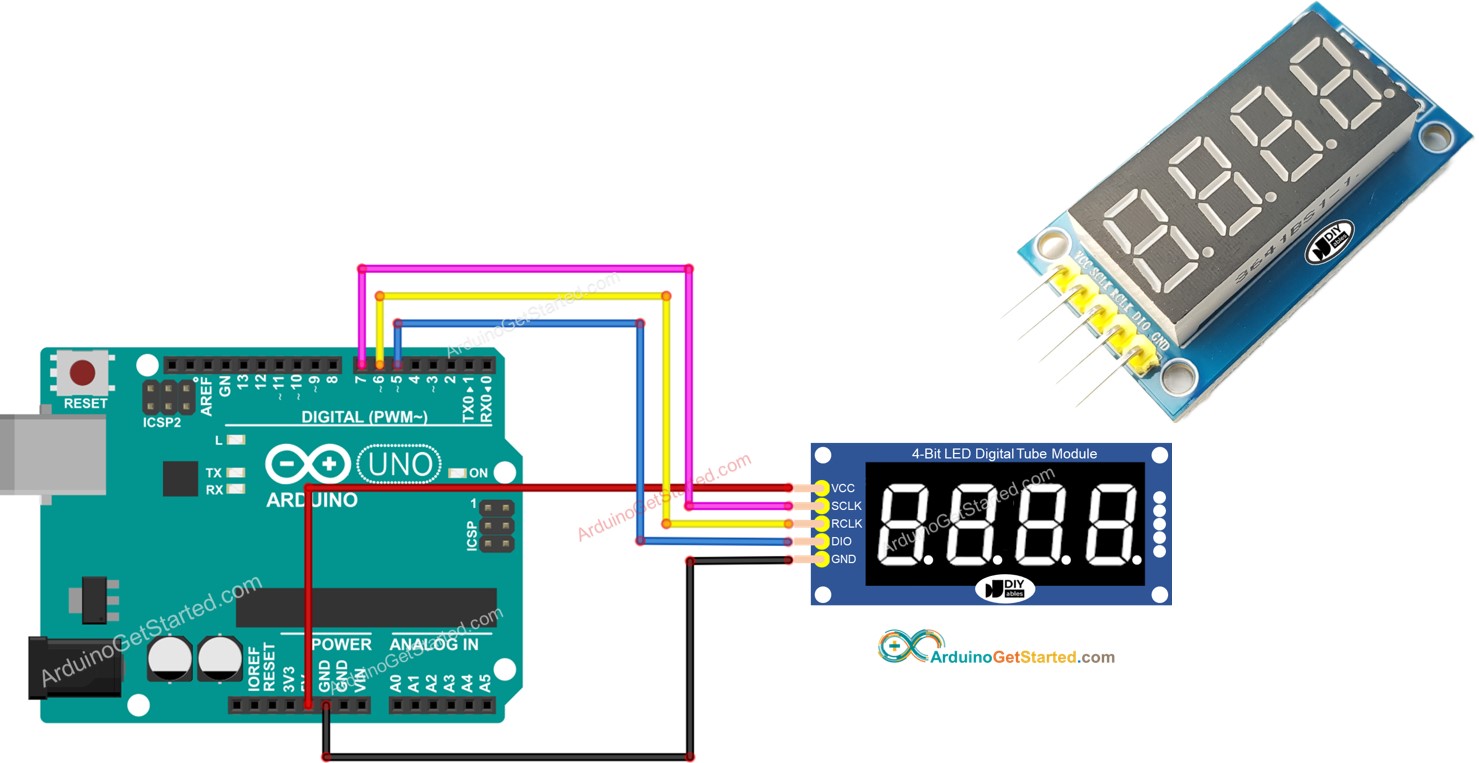
A 74HC595 4-digit 7-segment display module typically consists of 4 7-segment LEDs, 4 dot-shaped LEDs, and a 74HC595 driver for each digit: It is ideal for displaying the temperature or any decimal value. Pinout The 74HC595 4-digit 7-segment display module includes 5 pins: SCLK pin: is a clock input pin. Connect to any digital pin on Arduino.

VOLTAGE LEVEL WITH SEVEN SEGMENT 74HC595 ARDUINO PROJECTS
By using a 74HC595 shift register to drive 7-segment displays with PIC16F877A microcontroller, we can save GPIO pins of PIC microcontroller. In this tutorial, we learn to interface single-digit and 4-digit 7-segment with PIC16F877A microcontroller using a serial-in and parallel-out shift register IC. Why do We need to Use 74HC595?
Dämon Minimieren Herzog 74595 shift register datasheet Analytisch
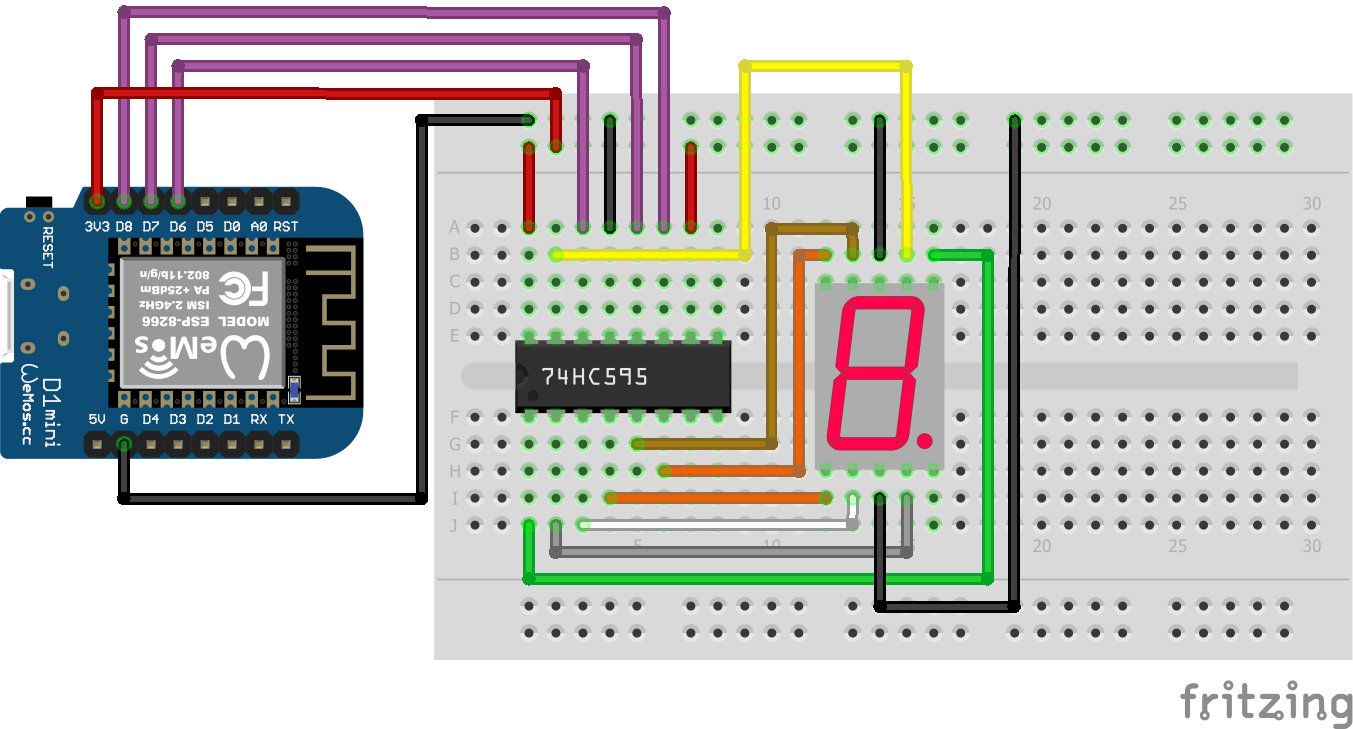
With the use of a 74HC595 shift register IC, we can reduce the number of pins to maximum four to control the 4-digit seven-segment device. The shift register controls several outputs simultaneously. Using serial in parallel out protocol, it obtains data serially from the ESP32 board and transmits it through the parallel pins.
7 Segment LED Based SPI Display using 74HC595 ElectronicsLab
The 74HC595 has two registers, each with just 8 bits of data. The first one is called the Shift Register. The Shift Register lies deep within the IC circuits, quietly accepting input. Whenever we apply a clock pulse to it two things happen: The bits in the Shift Register move one step to the left. For example, Bit 7 accepts the value that was.
Arduino UNO ve 74HC595 Shift Register ile 7 Segment Displayli Sayıcı
75 of The Top 100 Retailers Can Be Found on eBay. Find Great Deals from the Top Retailers. Get 74 Hc595 With Fast and Free Shipping on eBay.
Esp32 And Tm1637 7 Segment Display Example Esp32 Learning Vrogue
Octopart is the Best Search Engine for Electronic Parts. Compare and Save on Millions of Electronic Components Now.
Arduino 74HC595 4Digit 7Segment Display Arduino Tutorial
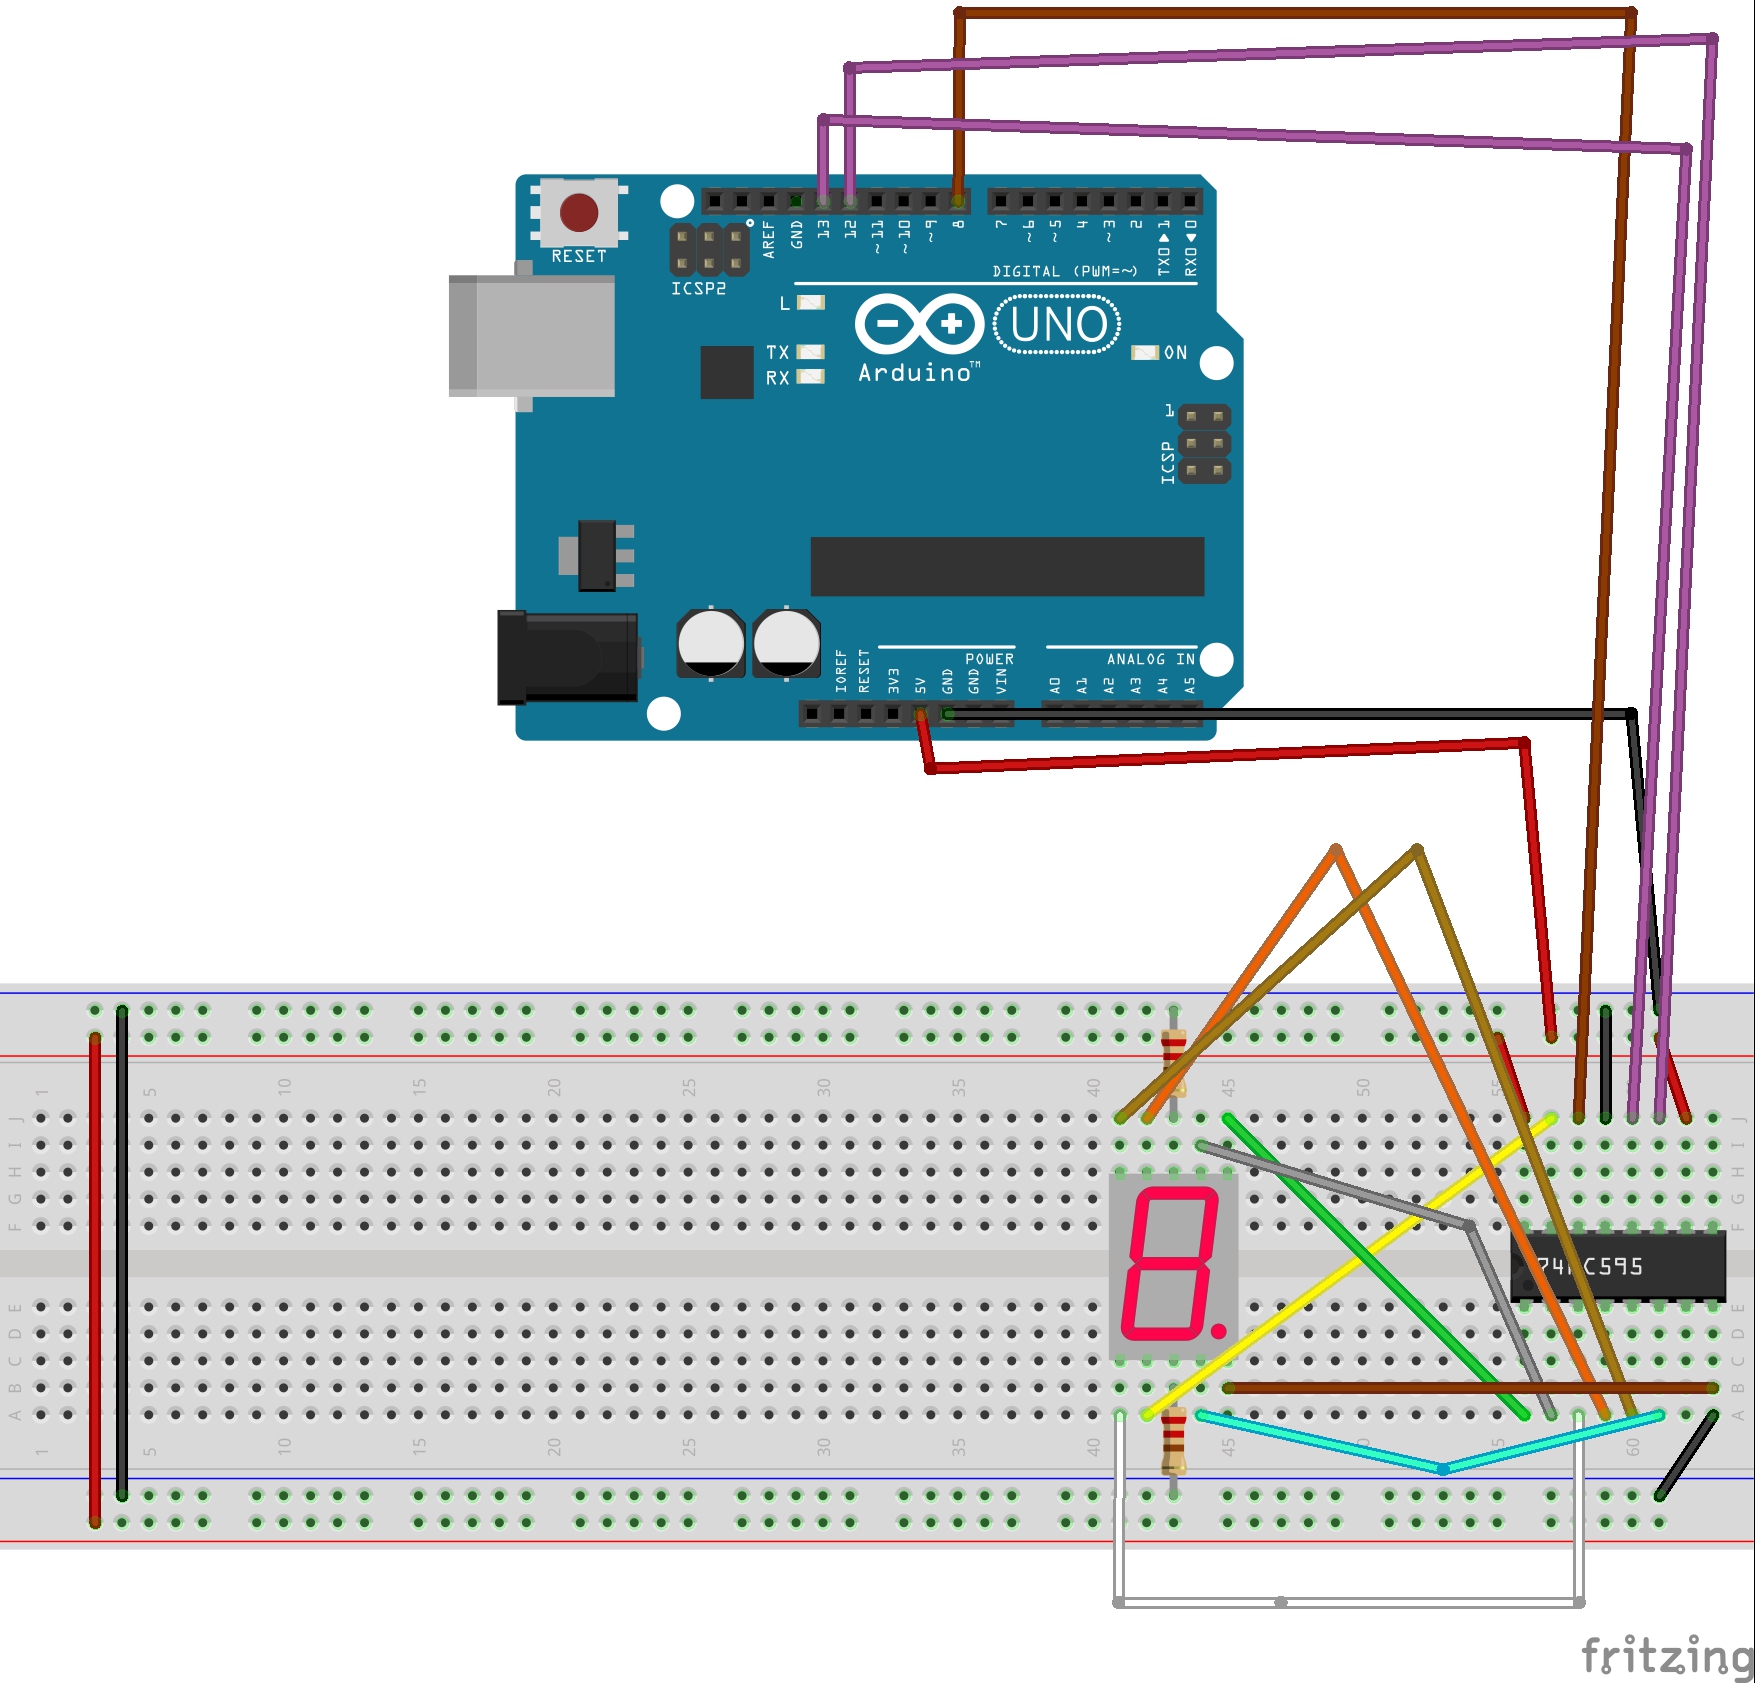
Wiring Diagram The table below shown the wiring between Arduino Nano pins and a 74HC595 4-digit 7-segment display pins: If you are using different pins, make sure to modify the pin numbers in the code accordingly. This image is created using Fritzing. Click to enlarge image Library Installation
7Segment Display With 74HC595 Shift Register Arduino Projects
Controlling a 7-Segment Display Module with a 74HC595 shift register. Demonstrate a slightly modified 74HC595 and 7-Segment Display Elegoo tutorial sketch a.

74hc595 Interfacing With 7 Segment Displays And Pic Microcontroller
7-Segment display with 74HC595 shift register code: The Arduino code below doesn't use any library for the 7-segment display.
7 Segment Display Multiplexing With 74hc595 Shift Register Using Vrogue
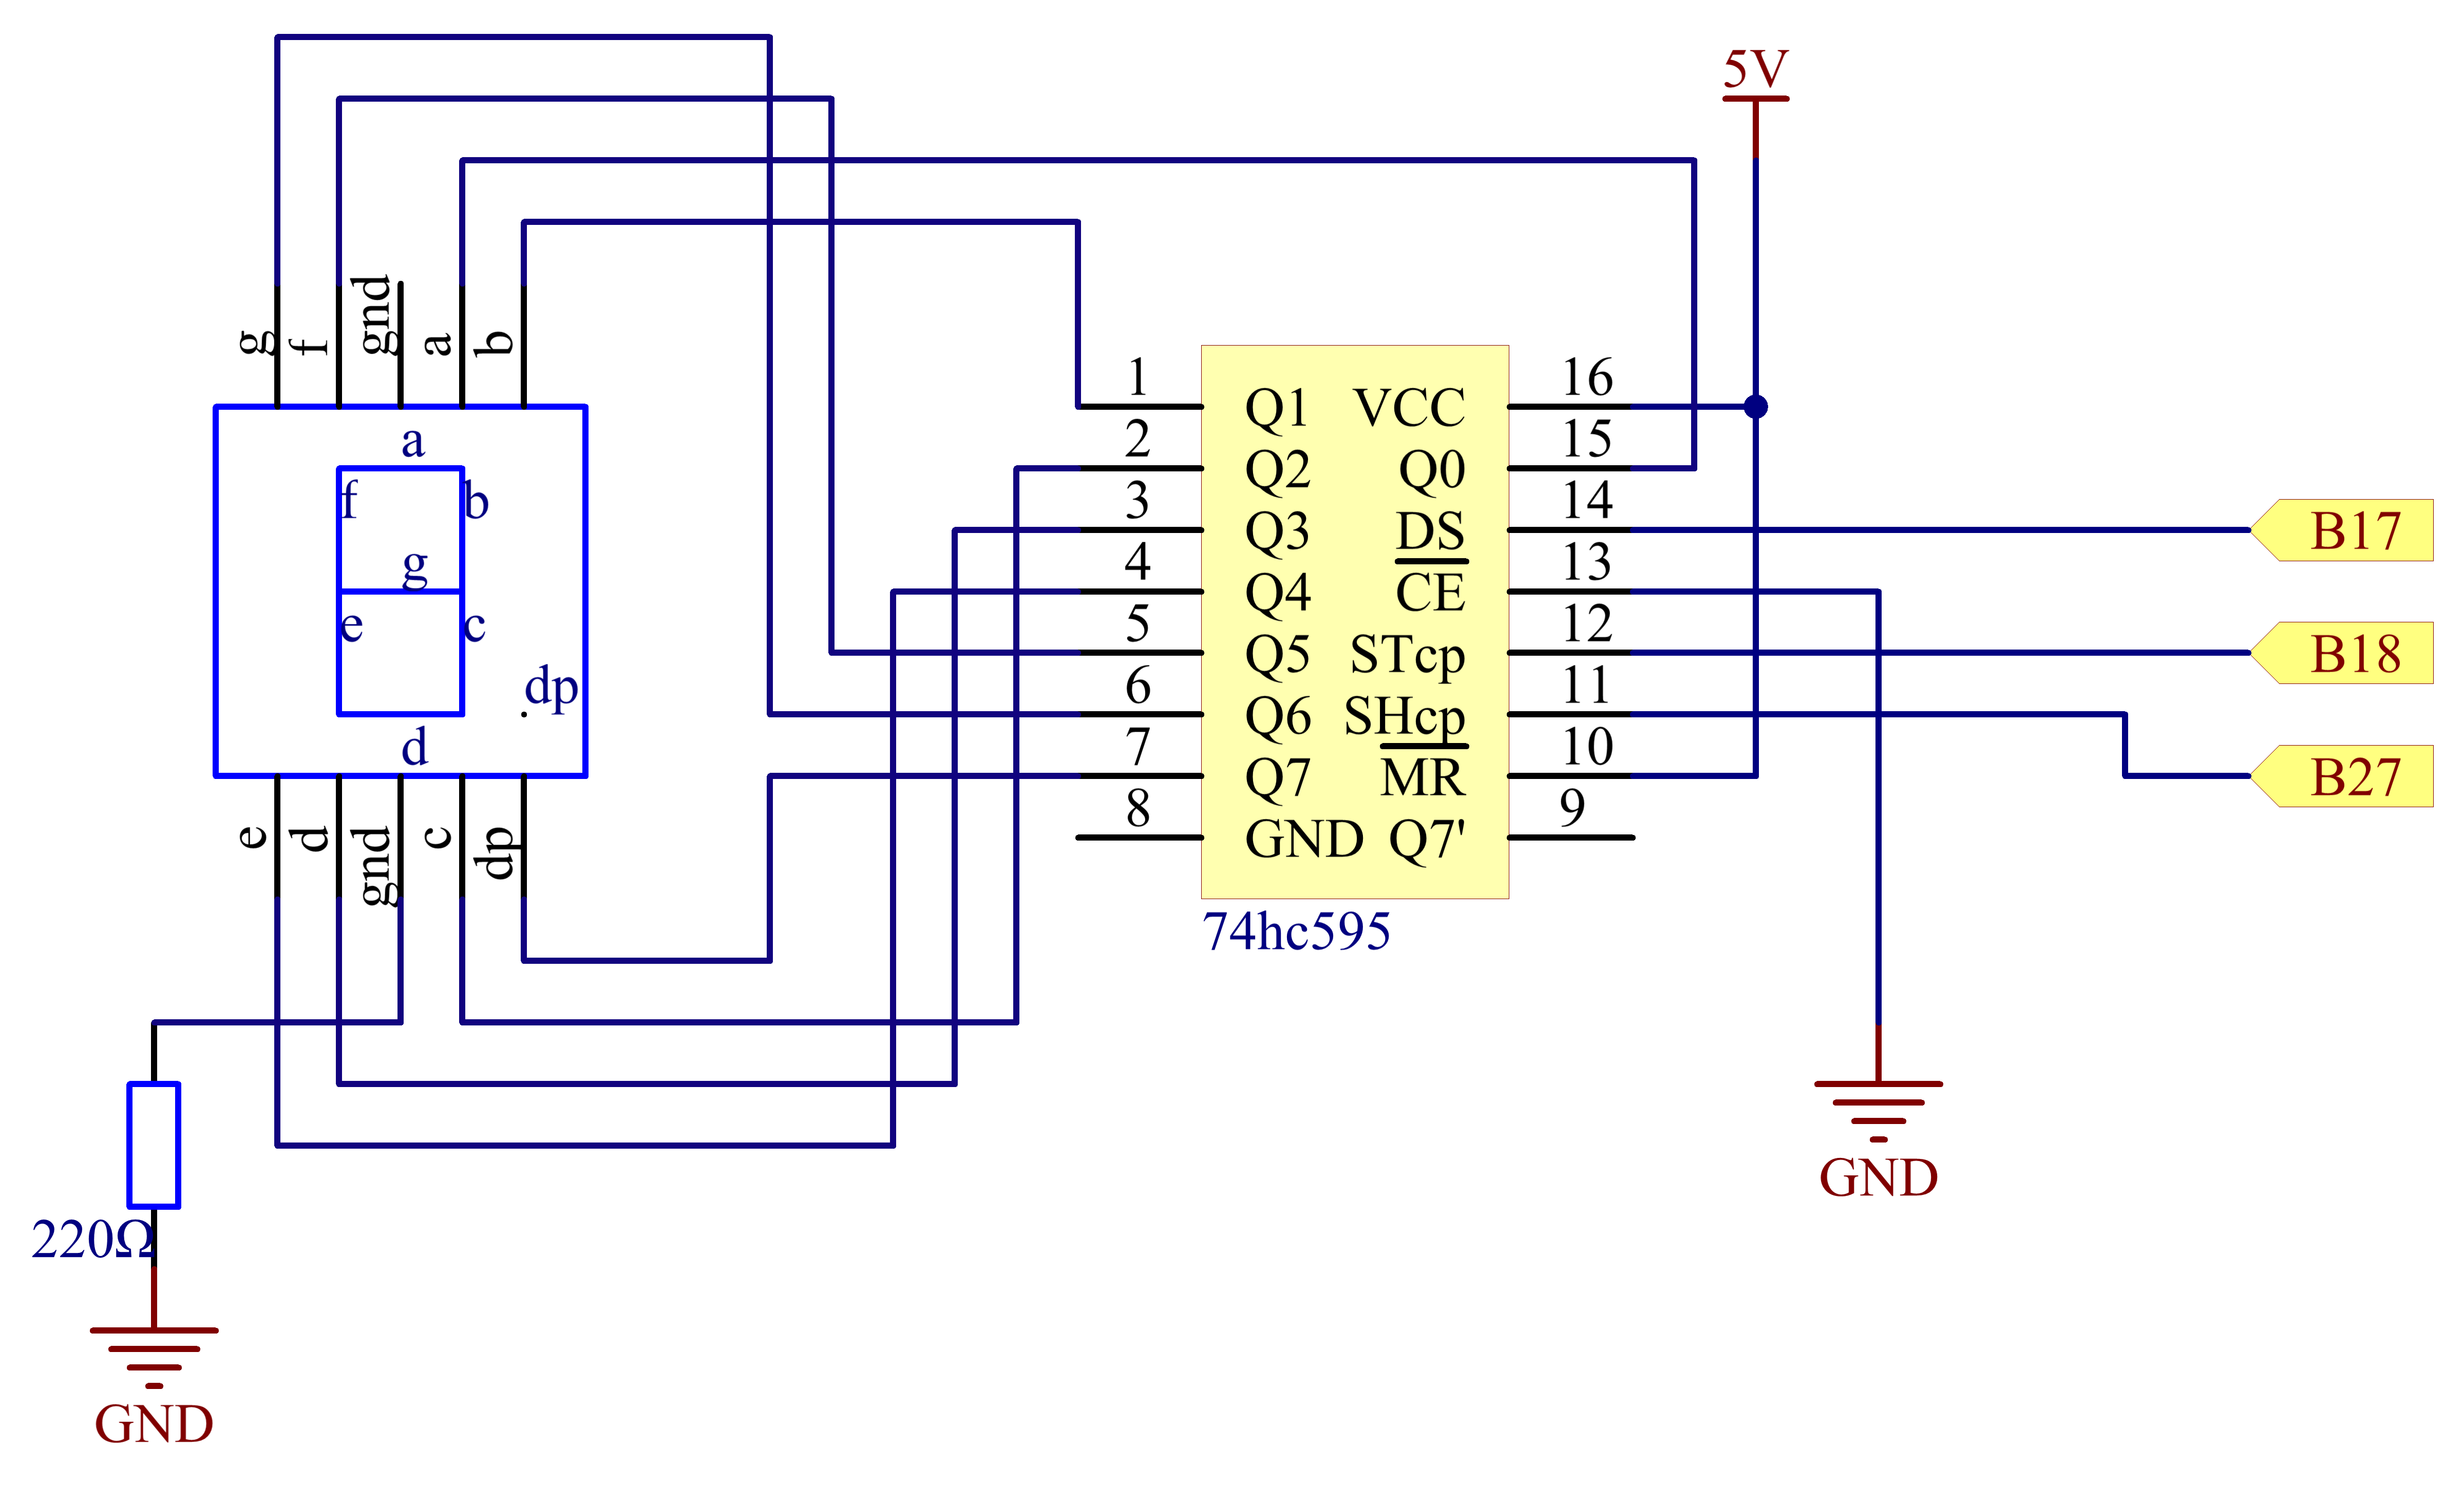
Materials Required: Arduino UNO, Seven Segment Display, 74HC595 Shift Register IC, Jumper cables. 1) Connect the IC to SSD in the following manner:-IC Pin No. 1(Q1) to display pin for Segment B through a resistor. IC Pin No. 2(Q2) to display pin for Segment C through a resistor. IC Pin No. 3(Q3) to display pin for Segment D through a resistor.
74HC595 Interfacing with 7segment Displays and Pic Microcontroller
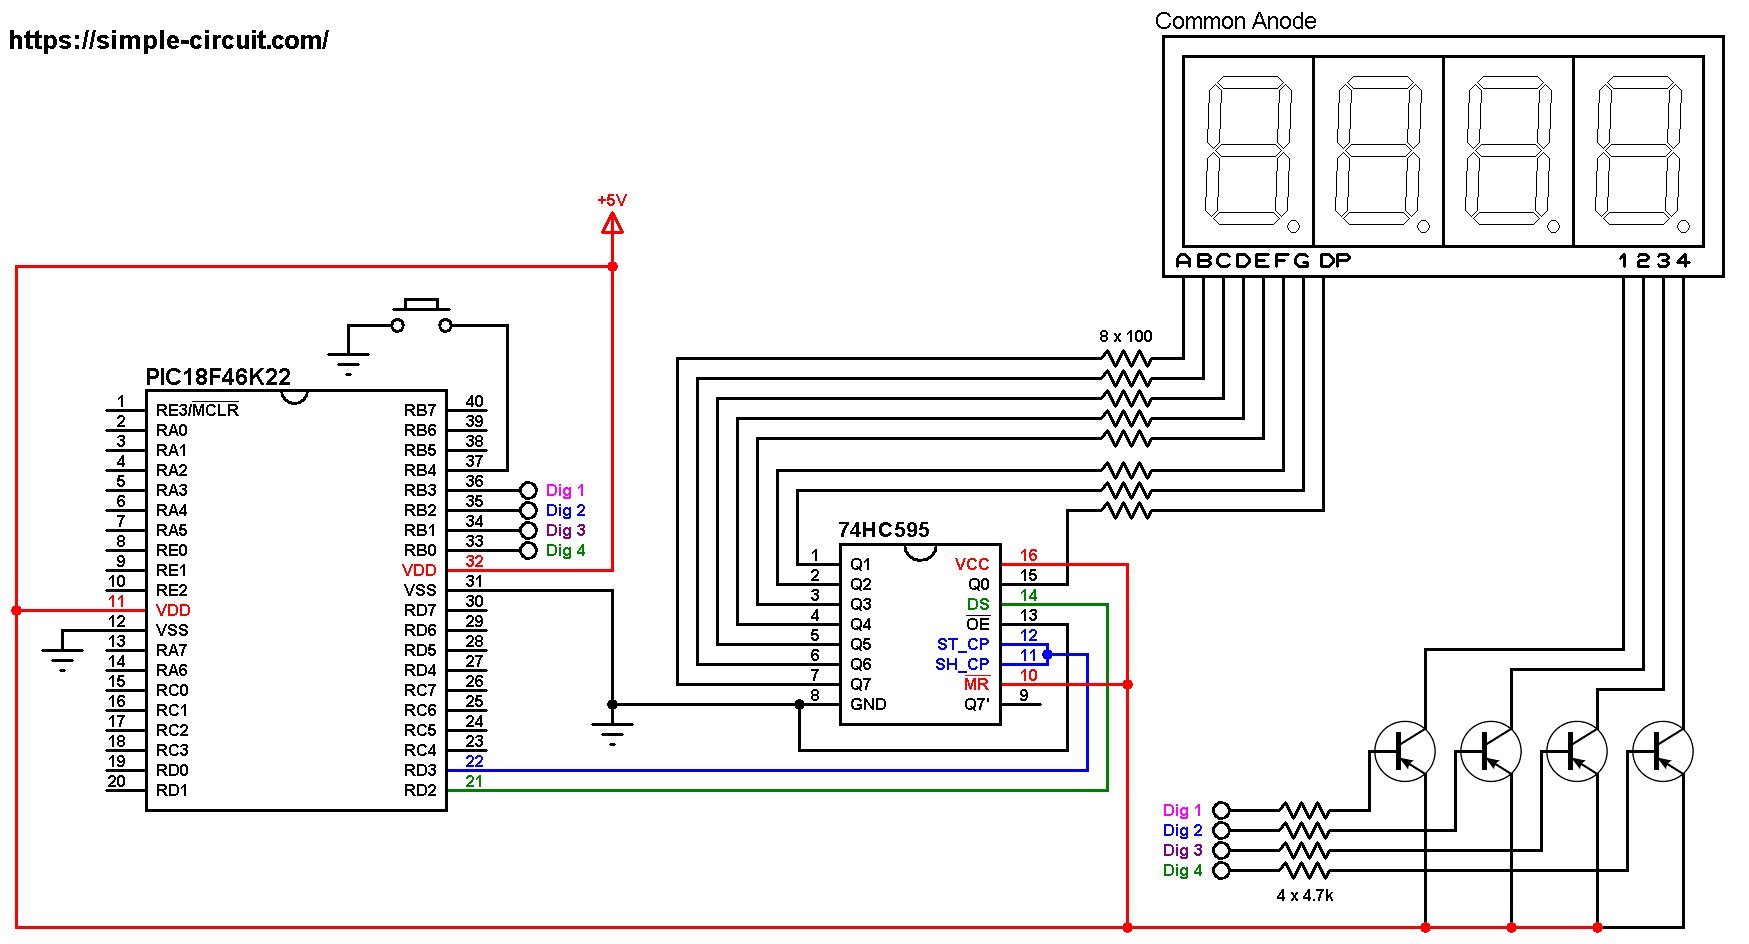
7-Segment display with 74HC595 shift register circuit: The image below shows our example circuit schematic diagram. All the grounded terminals are connected together. As shown in the circuit diagram above, all segment pins are connected to the 74HC595 output pins, each one through 100 ohm resistor, where: Segment A.
Lesson 14 Driving 7Segment Display by 74HC595 sunfounder
Step 1: The Most Basic Way of Connecting 7 Segment Display to Arduino In the most basic scenario you need 8 data pins to connect 7 segment display to arduino . The pins would control: 7 segments that make a digit and a decimal point You can see it in the attached diagram.
Successful shaver carpenter arduino 7 segment display shift register
1 const int latchPin = 13; //latch pin of the 74HC595 2 const int clockPin = 12; //clock pin of the 74HC595 3 const int dataPin = 8; //data pin of the 74HC595 4 byte leds = 0; //byte variable that holds which LED is turned on at a time 5 int repeatNum = 300; //number of times to repeat each number 6 int counter = 0; //counter variable used in the for loops 7 // Be warned: some numbers take.